How To Build A DIY Basement Dry Bar Step by Step
Our unfinished basement had this 4 x 8-foot nook, and all I could picture there was a little kitchen area. It would have been super easy to relay water supply to that area, but installing drainage would have been a massive expense that we didn’t budget for. The alternative? A DIY basement dry bar!
I thought it would be fun to share a short timelapse video of the whole project before I explain how we did it step by step.
Step 1
I began by installing 1/4-inch underlayment boards on top of the subfloor. They are kept in place by nailing them to the subfloor. If you have existing flooring, you can skip this step altogether. We needed this for the baseboards in this area to line up where the vinyl meets the carpeting.
Step 2
The cabinets had a white melamine finish (the most affordable option I could find). Although Behr Scuff Defense has a built-in primer, I decided to prime them with Zinsser Bulls Eye 123.
I also used a sanding block to scuff the melamine and give the paint more grip. I used a paintbrush and foam roller to apply both the primer and paint.
The paint color is such a beautiful flat black, and I didn’t want to spoil it with a sealing topcoat. Only time will tell how well it holds up, but so far, so good.
Step 3
Installing the cabinets was really easy. I cut a 4-inch strip of MDF that I placed between the wall and the first cabinet. I’m no millwork expert, I merely copied my kitchen cabinet installation, but it does make for a more polished look. After clamping the two cabinets together, I screwed them together from the inside. I used a stud-finder to determine the exact position of the studs behind the drywall and secured the cabinets to the wall.
Because I decided to buy pre-assembled cabinets, the sizes best for this space were limited to 30-inch 0r 36-inch wide, each. Two 36-inch cabinets wouldn’t leave enough room for a mini-fridge. I got two 30-inch cabinets, leaving an opening a bit too big for the mini-fridge. We used some leftover MDF to build a 7-inch box of the same height and depth as the cabinets to put on the mini-fridge’s opposite side. It filled the gap up and also served as a support for the countertop. It’s an open box only big enough to store a serving tray but useful nonetheless.
I installed the drawer pulls, and door handles using a template made for this purpose. It made it super easy to know where to drill the screw holes without messing it up.
Step 4
With the cabinets in place, the flooring could be installed. We had leftover luxury vinyl from Stephen’s hobby room, and I used every last piece! I threw away an 11-inch offcut.
Step 5
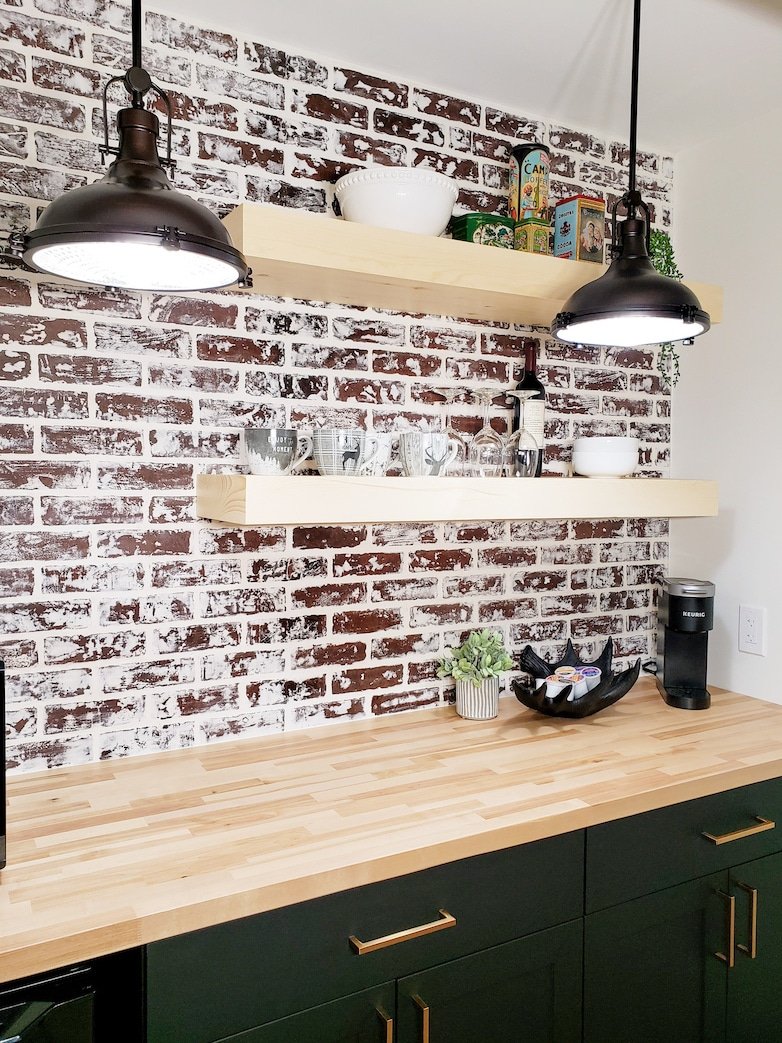
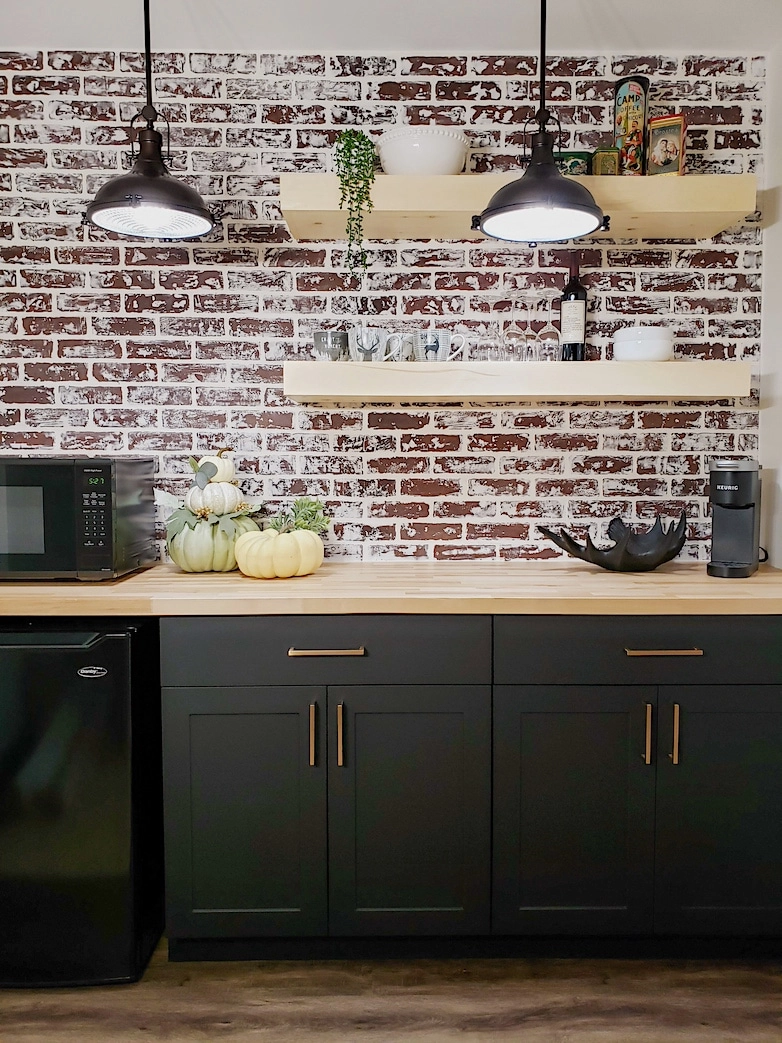
Finally, it was time to install the faux brick panels! Let me tell you, the walls in that nook might look straight, but they are very far from it. Cutting the panels to size gave me nightmares, and Stephen took over. Somehow he made it work, but there were a few gaps that were showing.
We nailed it to the wall right into the studs after applying a few dabs of contractors glue to the back of the panels.
I decided to give them a German Schmear finish, and I think it was the right choice. I love how it turned out. This technique is something I have never tried before, and I winged it all the way. I used drywall compound just because that’s what was on hand.
Step 6
For the countertop, I chose a butcher block. I did the same in the laundry room, and it’s working great. The one in the laundry room is made of bamboo, but I could only find them in 5-foot lengths. I found only a few 8-foot-long options and chose one made of Birchwood as that was the most affordable.
I sealed it with Varathane Triple Thick One Coat clear finish. It’s a flat finish with no shine at all and being water-based, it’s effortless to work with and clean brushes afterward. The first coat raised the woodgrain slightly, and I gave it a light sanding (just passing over with a sanding block) before applying a second coat. It is now satin-smooth and feels very durable.
Step 7
I built two floating shelves from pine. The hidden supports are also made from wood, and they require no special hardware. I sealed them with the same product I used for the butcher block.
Step 8
Stephen installed the two pendant lights since electrical work is his area of expertise in all our DIY projects.
Step 9
Finally, finishing touches and styling. We furnished it with a mini-fridge, a microwave, and a coffee maker. Coffee mugs, wine glasses, and a couple of bowls completed the nook. All the comfort we wanted, right there!
Tools:
- Nail gun
- 2-inch paintbrush and 4-inch foam roller
- Cordless drill
- Cordless screwdriver
- Miter saw
- Circular saw
- Drilling template to install cabinet hardware
- Stud-finder
- Level
Building Materials Used To Build the DIY Dry Bar :
- 1/4 inch thick Sureply underlayment or hardboard
- Luxury vinyl flooring and underlayment (we used what was leftover from the hobby room)
- 30-inch wide pre-assembled kitchen cabinets (two of them)
- Zisser Bulls Eye 1-2-3 waterbased primer
- Behr Ultra Scuff Defense in black (color name: limousine leather)
- Cabinet hardware (6 in a champagne bronze finish)
- Two faux brick panels
- 98-inch Birchwood butcher block
- Varathane Triple Thick One coat clear matt finish (waterbased)
- Wood for the floating shelves

Shop the Look
These are affiliate links. Read our Disclosure Policy for full details.

Posts Related To Building A DIY Basement Dry Bar:
Pin This For Later!

Which cabinets did you buy from Home Depot? Love how your dry bar turned out!
Hi Shay! Thank you for stopping by. Here’s a link for the cabinets: https://rstyle.me/+Us27aJJRNiUSUAFT9pNJmg
I love how the bar area came out. It looks amazing!
Thank you, Tammy! It is one of our favorite spaces.