How to Decorate a Christmas Tree Better Than Ever Before!
Decorate a Christmas tree better than ever this year with these amazing tips. Here is how to make your tree look spectacular in just a few hours!
I realize this is a pretty bold claim, but hear me out. I just finished decorating our living room tree for this holiday season, and it looks better than ever before. Last year, I said the same, but it took me several days to pull together the color scheme, find the perfect tree topper, and hang the decorations until I was happy with the look.
This year, things were very different. I planned it out in my head for a while, but once I started, I was done within a few hours, and I was stunned by how good it looked in such a short time. Here’s what I did.
This post contains affiliate links that may generate a commission at no extra cost to you. (Full disclosure policy)
Fluffing and Shaping the Branches of the Christmas Tree
Fluffing out and shaping all tree branches is time-consuming and tedious, but it lays the foundation for a great-looking full tree. I was completely overwhelmed the first time I shaped this tree, and I’m sure I missed a few spots.
This time, I tried a new tactic, and it worked really well. Instead of assembling the entire tree, placing down the tree stand, inserting the bottom section, and then the second, third, and fourth sections, I fluffed and shaped each section before placing the next one on. This way, you won’t miss a single branch.
Checking the Lights or Hanging String Lights on the Tree
If you have a pre-lit tree, now is the time to check if all the lights are working. I plugged in and checked each section individually as I shaped the branched; it was also much easier than checking the whole tree. If you are hanging string lights, you would wait until the tree is fully built.
I saw a great article on the Bob Vila website earlier this week that you might find handy: Different ways to hang Christmas Lights.
Have you ever wondered what the ideal number of lights on a tree is? A good rule of thumb is 100 lights for every foot your tree is tall. You can always have more, but less may look a bit sparse.
Choosing a Color scheme or Theme to Decorate a Christmas Tree
This step is, of course, optional. It is totally fine if your tree looks the same every year. All that matters is the joy it brings you and your family. By no means do I think everyone should change the style of their tree every year.
When our kids were little, we used the same decorations every year, including the precious little handmade ornaments they made at school. Everything was multi-colored, and the brighter and shiner, the better! This is a photo of the last tree I remember decorating with all the bright and shiny decorations.

Now that I have free rein and the excuse to create inspirational content for the blog, I like to try new ideas and experiment with a new decorating style each year. Come to think of it, so far, the decorating style always ended up being traditional, but choosing a different color palette can give a whole new look to every Christmas season’s decor.
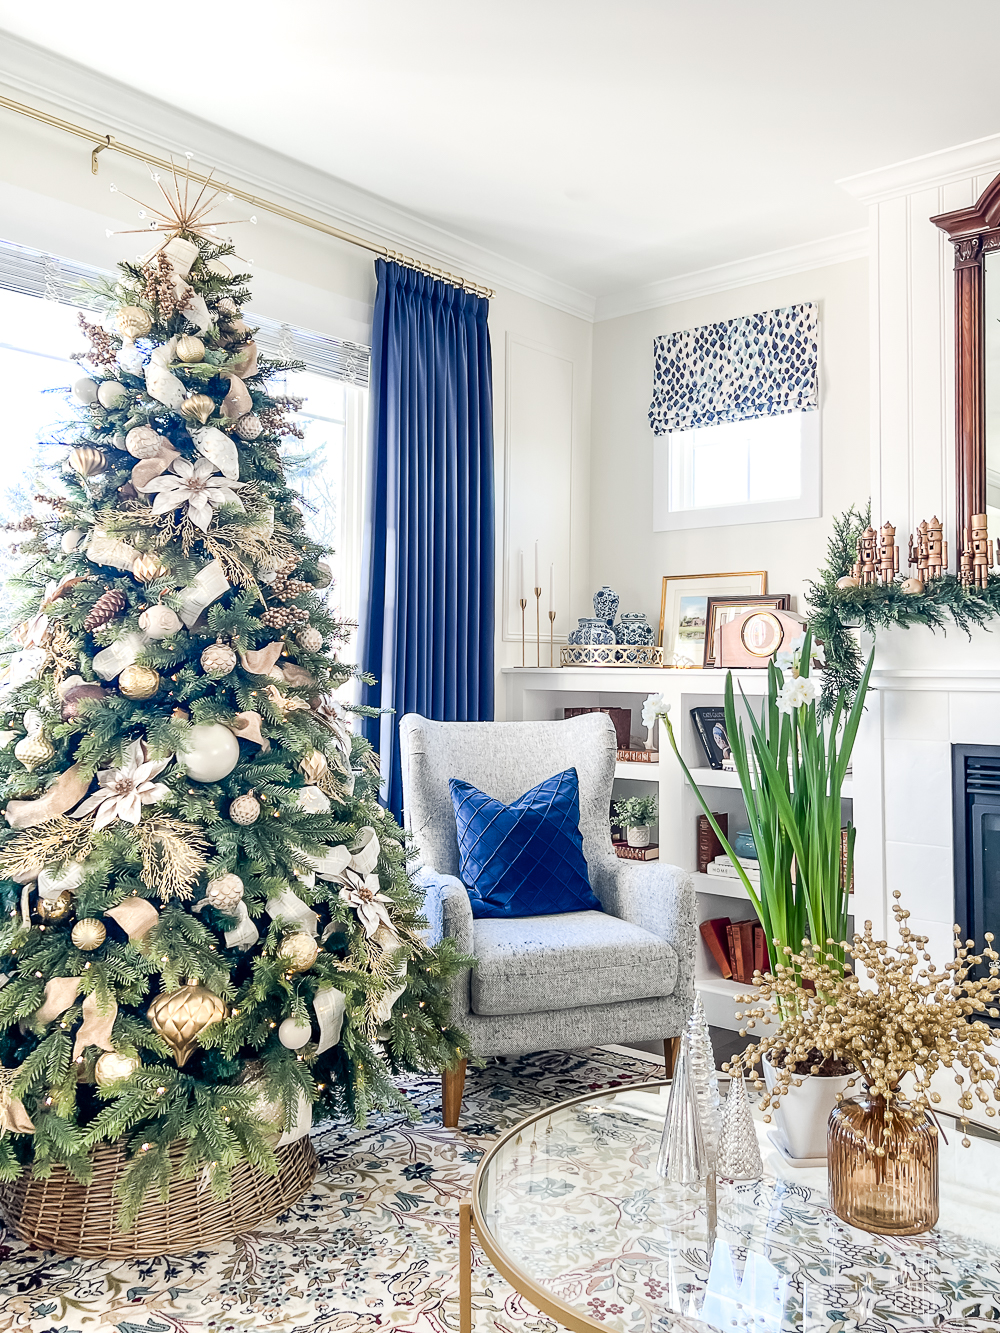
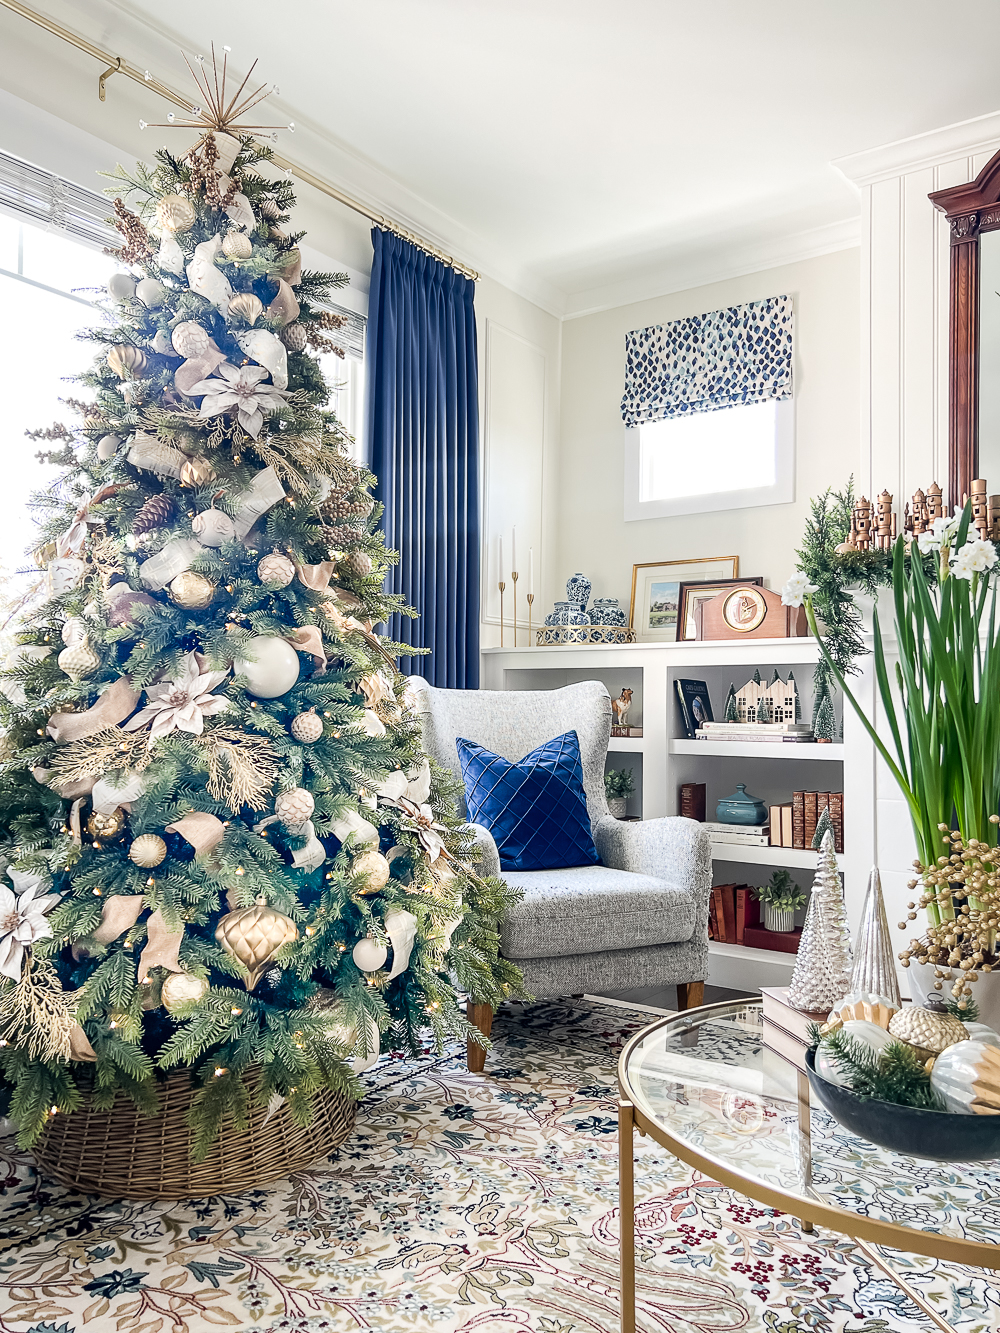
I chose a gold and creamy/pearly beige color combination this year. It’s the first time ever I haven’t used any bold or dark colors. Younger me would never have agreed to this, but I must admit I enjoy the calmer, subdued colors. It feels peaceful.
Adding Ribbon or Garland to The Christmas Tree
I used to have a love-hate relationship with ribbons (on a Christmas tree). In recent years, I bought a few rolls (usually about three), cut them into pieces (as suggested by many pros), and placed them throughout the tree. I never seemed to master the look I wanted. Until this year!
This year, I bought way more rolls of ribbon in the same color but with different designs. I also decided not to cut any of them into smaller pieces. If all else failed, I could take them down and use them to wrap gifts.
My strategy was the same as with my DIY projects: I visualized the whole process several times until I was confident to give it a go.

I used craft wire (similar to floral wire) to tie a loop at the start of the roll, with a bit extra wire to fasten the loop near the top of the tree.

Once the loop was tied securely, I let the rest of the ribbon roll down all the way to the end. Using one continuous piece to create more loops down and around the tree was so much easier.

As I gathered and tucked the loops into the tree, I used the softer inner branches to pinch or twist them together.
Ribbon on a Christmas tree is not for everyone. Maybe you use garland to give your tree a fuller look. Both are optional, as you might aim for a more minimalistic look or even a naked tree. It’s all a matter of taste.

Ultimately, I used four different ribbon designs and five and a half rolls in total. That’s a lot, I know, but it helped me to finally achieve the look I wanted.
Creating Custom Decorations to Decorate a Christmas Tree
Every year this time, I thank myself for creating a storage system for my holiday decor and separating and storing ornaments in color groups. To my surprise, I found that I didn’t have a ton of gold ornaments despite using gold every year. As for beige, creamy, pearly decorations, I had none!
I didn’t want to buy a bunch of new Christmas ornaments because I was running out of storage space, and secondly, I secretly challenged myself to spend as little as possible on decorations this year. Did that stop me from using a new color? No! I’ve been itching to paint ornaments and create something custom to decorate a Christmas tree that will be unique.
There were plenty to choose from. Some metallic ornaments were too shiny and cheap-looking, others were in colors I didn’t fancy anymore, and a few looked scuffed and worn out.

By using chalk paint, spray paint and a little Rub n Buff, I had a bunch of new ornaments in the exact colors I needed.


I also painted seven giant poinsettias that had a bit of pink added to them last year when using them on the staircase garlands.

Chalk paint in the color Sand Bar was perfect as a base color, followed by dry-brushing them with an off-white color that made the raised detail on the flowers stand out. I finished with a coat of pearly glaze, but once it had dried, it was barely visible. The photo above shows the “before”, “during,” and “after” looks next to each other.
How to Arrange Ornaments and Florals on the Tree
Another new thing I tried while decorating this year’s Christmas tree was to hang ornaments in clusters. I started with the seven faux flowers, and before placing them on the tree, I added two glittery gold cedar leaves to each flower.

That made a huge difference, and I couldn’t be more pleased! The seven flowers and 14 leaves looked so good that I didn’t feel the need to add a gazillion smaller ornaments. That was the biggest time saver ever!

It also became evident that various textures in the same color can create more interest than loads of ornaments in different shapes, sizes, and colors. My mind was slightly blown!

If you aim for an overall look like this for your Christmas tee, you will get the best results using a combination of small, medium, and large ornaments. Start with the larger ornaments and fill any gaps deep within the branches.

Use smaller ornaments to decorate the outer branches, but not right on the tips of the branches and not dangling from long strings.
Use craft wire to attach the ornaments close to the branches and also further back on the branches.
Ornaments dangling from the tips of the branches can be beautiful, but that is an entirely different look.
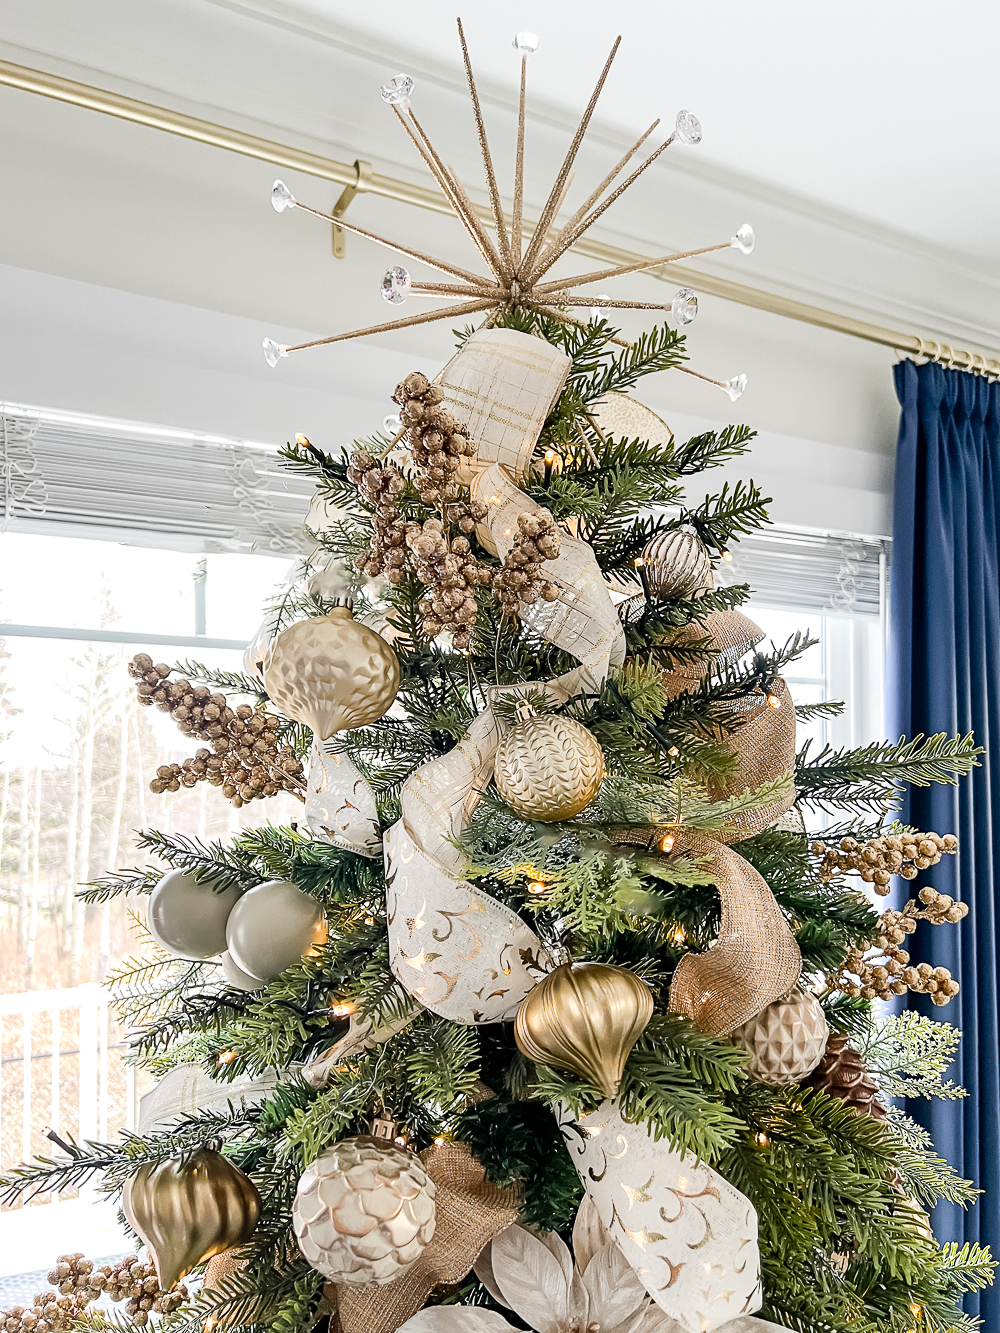
Adding a Tree Topper
Do you use a tree topper? Or maybe use a bunch of floral picks to create a beautiful focal point at the top of the tree?
When I was a child, my family believed that placing a star on top was the last step when decorating a Christmas tree. It had to be a star; nothing else would do.
I believe you can do whatever you want, but I find myself using a star more often than not.
Last year, I bought a new glittery, spiky star tree topper. I used it again this year, but I changed it a little.

I used my hot glue gun to place acrylic “diamonds” on the tips of about half of the spikes, just for fun.
And then? I called it a day! Completely content with my efforts.

Do You Decorate a Christmas Tree with a Tree Skirt or a Tree Collar?
Covering the tree stand with a tree skirt or tree collar gives your beautiful tree a polished look. Whichever one you prefer, is a matter of taste.
If you are using a solid one-piece tree collar like me, place it over the tree stand first before adding the tree itself. Trust me on this one!
/Tree collar / /Similar tree/
When using a tree skirt, it can be the last thing you add when you decorate a Christmas tree.
That was an absolute mouthful! Let me do a quick recap.
Best Tips to Decorate a Christmas Tree
Until next time, happy decorating!

Hi Marieza! Your tree is absolutely gorgeous! I love how you embellished the topper! Thanks for walking us through the process of how you decorated it! I’m always looking for tips on how to secure ribbons! Thanks!
Thanks for stopping by, Donna!
Absolutely gorgeous an absolute must try… wish I would’ve seen this before I decorated my tree this year!!!
Your tree is stunning! Thank you for sharing your tips with us.
Thank you so much, Maureen! I appreciate your comment.
Oh that’s beautiful Marieza! Gold and neutral is one of my very favorite color combinations, and I love what you’ve done with it! Next to your lovely mantel, your tree is especially gorgeous! Thanks for the progressive-fluffing technique – can’t wait to try that. (I’m in the “decorate late” camp!) Here’s to an extra wonderful holiday!
I’m so glad you like it, Barbara! Social media make us all feel like we are late but there’s still plenty of time to decorate.
Your tree looks amazing! Over the past couple of years I have done the ribbon thing, cut into pieces. Last year it worked but no so much this year. Next year, I’m going to try your method! Thanks for sharing this. I also love the painted decorations, they look fabulous.
Thank you so much, Carol!
I really enjoyed your process and thought pattern behind decorating your beautiful tree! I’m putting mine up this afternoon and don’t want the same old random ornament placement that I always do. I have a big collection to choose from and needed some new ideas on where to start. This very timely post will really help me rethink decorating my tree this year for a new (and improved) look. Thanks Marieza!
Valerie, your comment makes me SO happy! Thank you! Enjoy decorating your tree and feel free to share in our Facebook group.
That is the most beautiful tree I have ever seen.
Thank you so much, Walter!