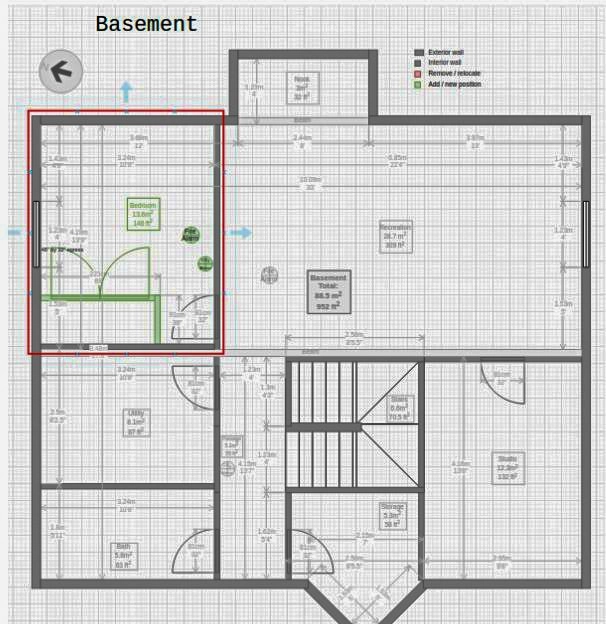
When we were in the planning phase of finishing our basement, the whole design had to revolve around the bathroom and where it would be situated. I’m guessing that is the case in most basements.
Before we started, the exterior walls were already framed and insulated, and there was minimal roughed-in plumbing tucked away in a corner. Considering where the door to the basement was located, that particular corner was not the ideal place for a bathroom.
Plumbing can always be moved, but breaking up the concrete floor would have been expensive, so we opted to move the door and surrounding walls at the end of the stairs. In fact, we removed it all to form a passage connecting the bathroom and storage room to the living area. That small change made a lot more sense. I take absolutely no credit for that as it was all Stephen’s brilliant idea. He designed the whole floor plan of the basement and did a pretty good job!
After the floor plan was fine-tuned, we applied for all the relevant permits. Once they were all approved, the fun and games could begin! First up was framing (the wood skeleton of the space). While Stephen finished building the last of the walls, I started to put up the drywall and finish the storage room across from the bathroom. We needed to get stuff out of the way (mostly crates full of Christmas decorations and all the decor I may, or hope to, one day use again).
Building The Bathroom: Step By Step
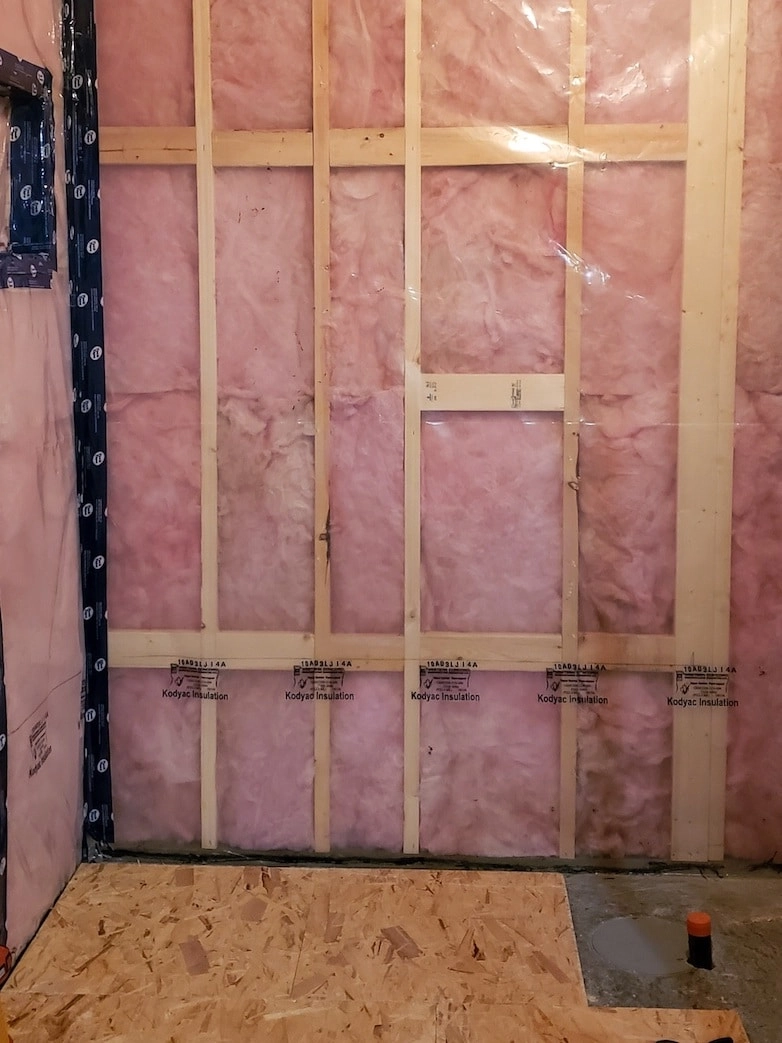
1. Framing The Walls
The position of the roughed-in waste pipe for the toilet and tub determined the size of the bathroom. It turned out to be a mirror image of the girls’ bathroom upstairs. Equal in width, but we could make it one foot deeper, making it just a tad more spacious.
2. Electrical Work
Stephen once again did all the electrical work, as with the laundry room remodel. If we had to hire an electrician, that would have been a big chunk of the project’s budget. Just a reminder: if you do not 100% know what you are doing, DO NOT DIY electrical work! He can now add to his skill set: installing an extractor fan with an exterior vent.
3. Installing Subfloor
We used Dricore interlocking blocks with a raised moisture barrier that lifts the subfloor away from the cold and possibly damp concrete floor. We are lucky to have a very dry basement, but we do enjoy the benefit of a warmer underfoot surface.
4. Installing The Bathtub
Positioning and securing the tub was extremely easy. Hooking it up to a p-trap and the existing water waste line inside the concrete slab was slightly complicated. We had enough plumbing knowledge to figure it out, but getting them to line up was tricky. I left this part to Stephen, and he made it work with a couple of PVC attachments.
Drainage was sorted, but we still needed water supply. At about the exact time we needed to do that, our water heater started to leak from every seam imaginable! It had to be replaced, and having a plumber on-site was heaven-sent! We decided to let him take care of the water supply as well as install the valve for the tub and shower mixer. I’m sure we could have figured it out, but get an expert to do the job when in doubt.
5. Waterproofing The Walls Surrounding The Tub And Shower
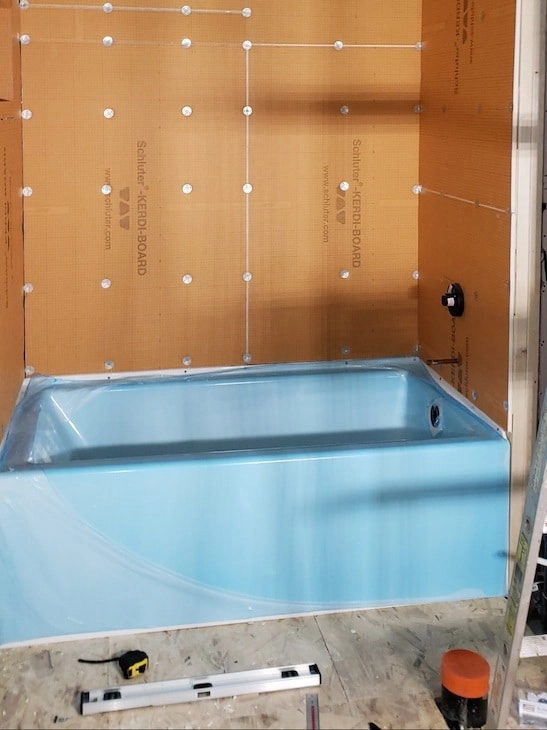
Most people use cement boards against the walls before tiling, but I used Kerdi board made by Schluter Systems instead. It’s a lightweight foam board covered with an orange waterproof membrane and it’s super easy to work with!
You simply attach the boards to the studs with screws from the same range and cover all the seams, corners and screw holes with rolls of the orange membrane that can be cut into strips or blocks, and secured onto the boards with tile adhesive. If done correctly, the three walls around the tub should form a waterproof unit, ready to be tiled.
6. Walls And Ceiling
Putting up the sheetrock for the walls and ceiling went really fast since the bathroom is tiny. When finishing a bathroom, it’s best to use green, moisture- and mold-resistant sheetrock panels.
7. Tiling The Tub And Shower Surround
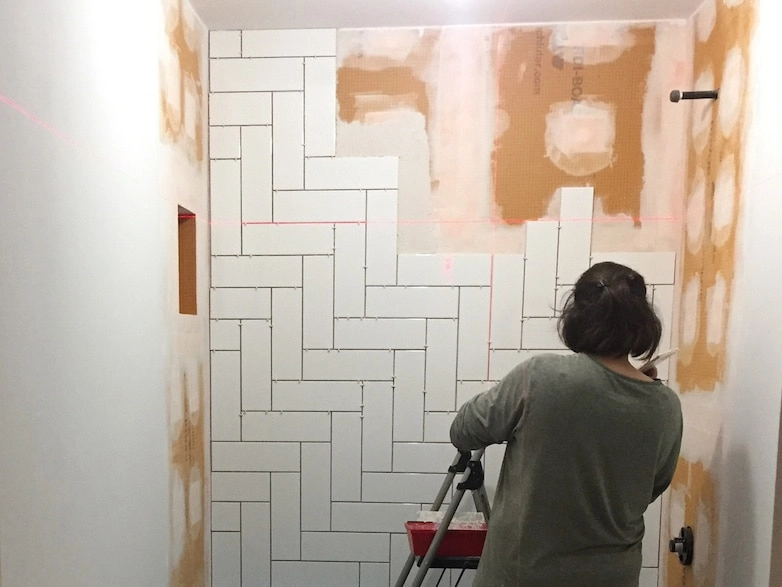
I used an inexpensive, plain white, 3 x 6-inch subway tile and instead created interest with the tiling pattern. An extremely ambitious plan for someone who has never tiled walls before! It was tough and took way longer than I thought it would, but I’m happy with the end result. Would I do it again? Preferably not!
After grouting, I installed the showerhead, mixer and spout. This was also a first for me, but these items come with such clear instructions that it would be difficult to mess it up.
8. Painting, Flooring And Trim
I used the same “Classic Silver” paint from Behr I used throughout the rest of the house. It looks a lot darker in the absence of natural light, but it works better than I imagined. For the flooring, I chose luxury vinyl tiles just like I did for the laundry room. Unlike the vinyl for the previous two projects, I chose tiles with a grooved edge to give it more of a “real” tile look.
9. Installing The Vanity And Toilet
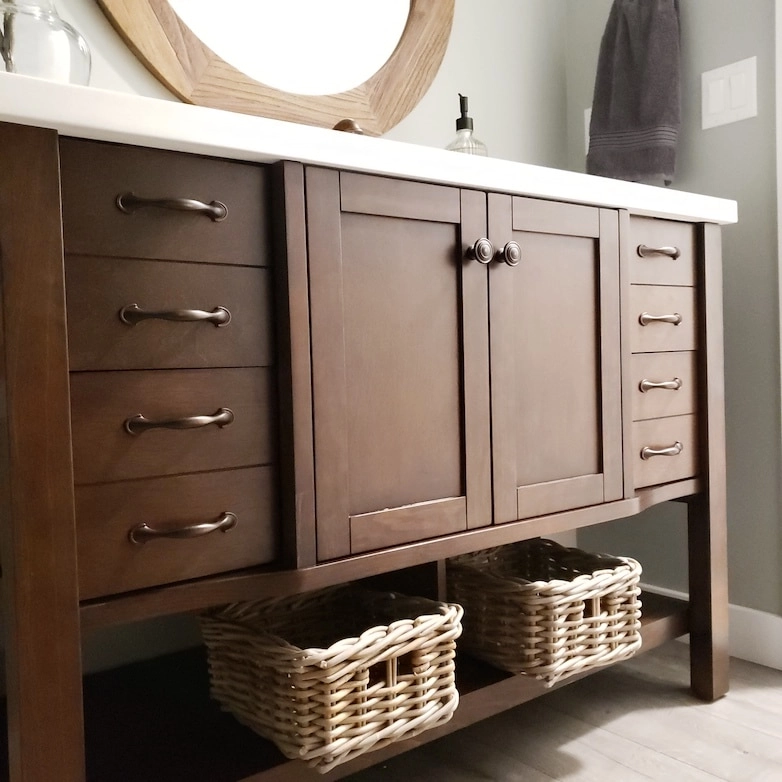
For the vanity and toilet to be installed, I had to put ball valve connectors on the water pipes the plumber just capped off. Luckily, everything is PEX pipe (plastic) and very easy to cut and join.
10. Hanging The Shower Door
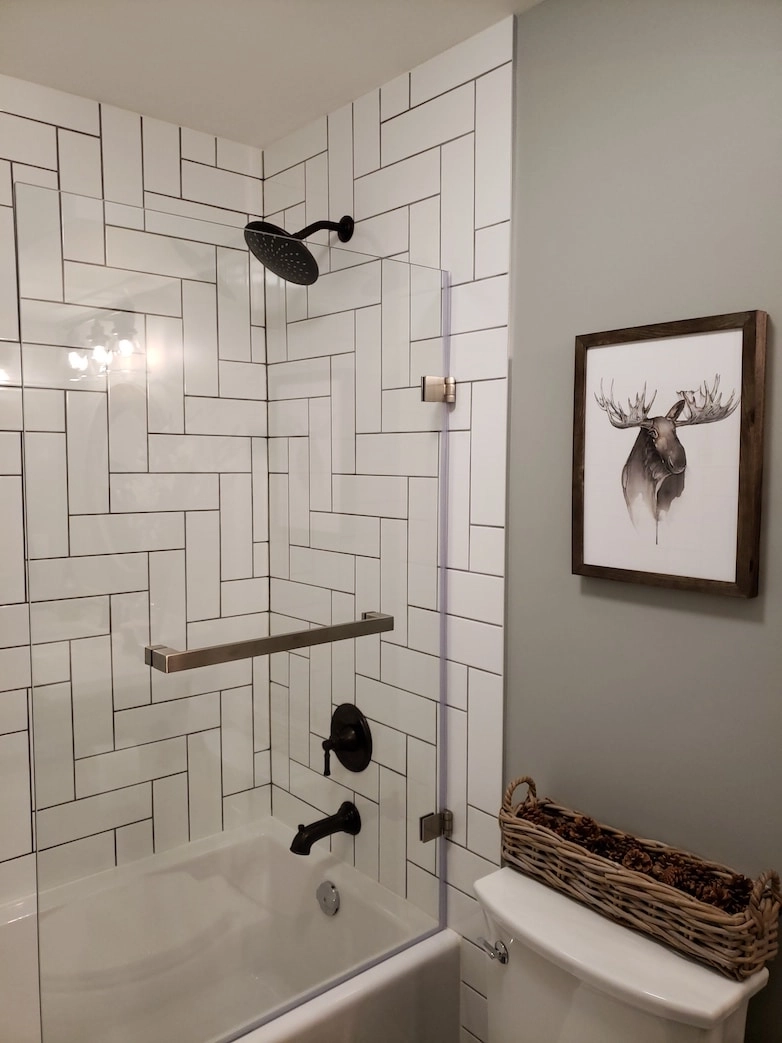
We decided to hang a frameless glass shower door instead of a shower curtain. This was a big-ticket item, but to us, totally worth it. Since we built the walls ourselves, we could ensure there was a stud to secure the shower door’s brackets into. That thing weighs a ton!
11. Final Touches In This Basement Bathroom
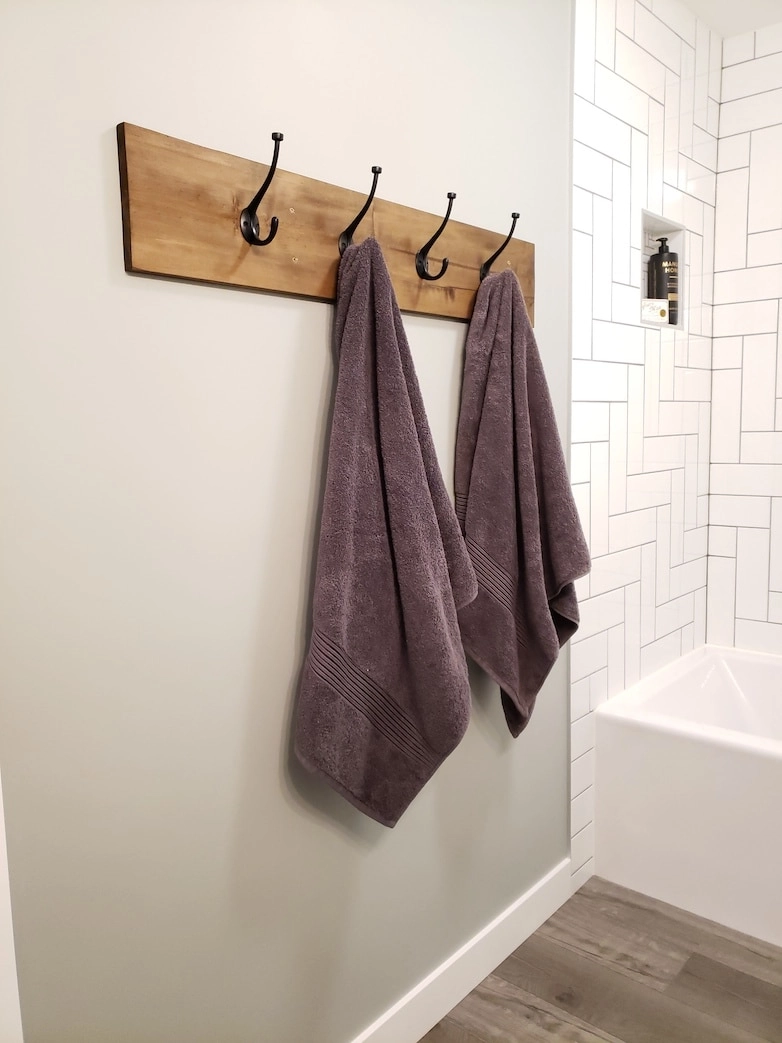
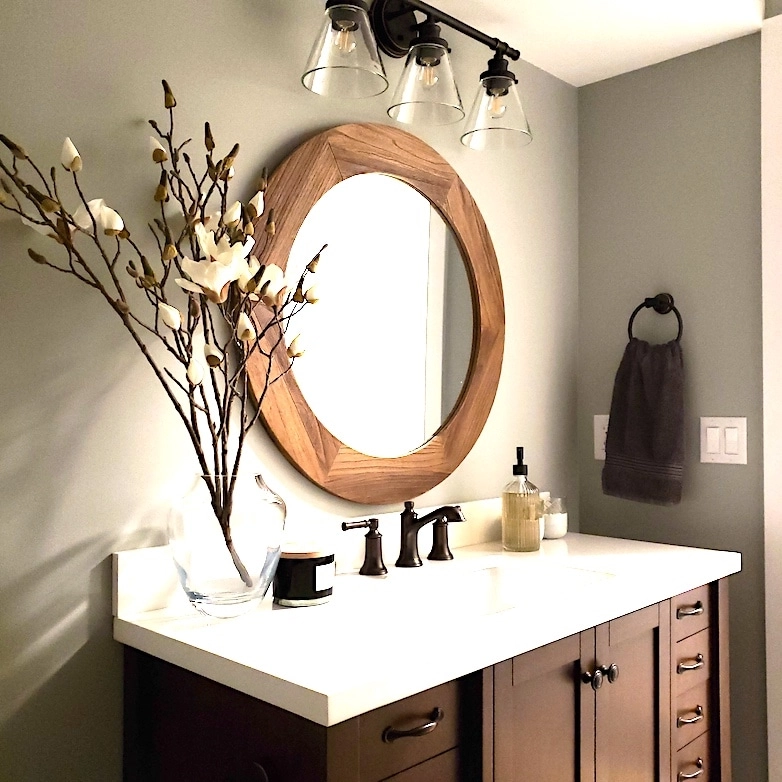
Stephen installed the light fixtures, handtowel rail, toilet paper holder, etc. The towel rail that came with the set we bought was ridiculously short! As a replacement, I decided that towel hooks would be a better option, and I could customize them. I simply stained a piece of wood and screwed four hooks to it. I think it suits the bathroom well.
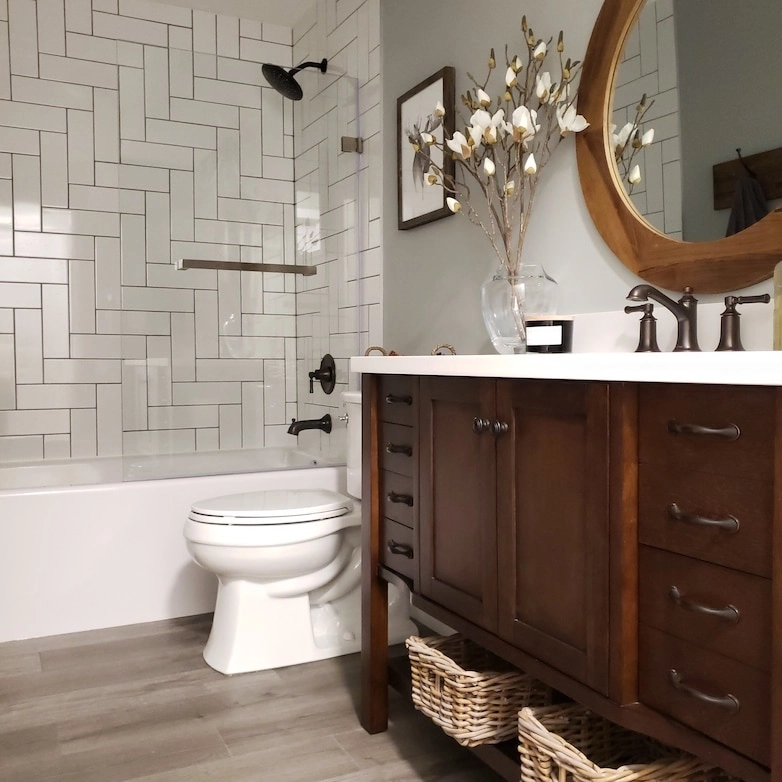
A few decorations later, and it’s complete! I am super stoked about this project. The outcome exceeded my expectations. Now to finish the rest of the basement!